
It may not be the most glamorous, flashy or exciting effect in Garageband’s AU plug-in arsenal, but rest assured – the built in compressor is one of the most useful available to you.
Way back in 2012 I put together a definitive guide on how to get the most from Garageband’s built in compressor. I noted that while it wasn’t the most feature rich of compressors out there, it did a sterling job of getting the basics right.
After Apple made the frankly bizarre decision to remove the built in compressor plug in from Garageband 10, we were left with a single incredibly vague Smart Control compressor ‘dial'( I wasn’t a fan of it…)
It wasn’t until the latest 10.0.3 update that Apple added their good old built in compressor Audio Unit back into Garageband (along with a ton of cool other stuff too). Seeing that it’s back in action, I thought it a good time to update that original article.
In this tutorial, we’ll look at how to get to grips with Garageband’s built in compressor as well as how it works on different instruments.
What Is Compression?
In a nut-shell, applying compression to a track in Garageband lowers the volume of loud sounds to the same level as the quieter sounds. You can then raise the gain of your compressed track, having reduced any peaks or troughs in the volume.
How much compression you’ll want to apply depends entirely on the type of instrument or genre of music you’re working with. You wouldn’t use the same compression settings on a face melting guitar solo as you would a violin melody, or the same set up on a drum track as you would on a vocal track…
By far the most important thing to remember – especially if you’re just getting to grips with compression – is make sure you don’t over-compress and leave your tracks or project sounding squashed or lifeless.
How Does It Work?
Much like the version found in earlier iterations of Apple’s entry level DAW, Garageband 10.0.3’s built in compressor is intuitive and simple to use.
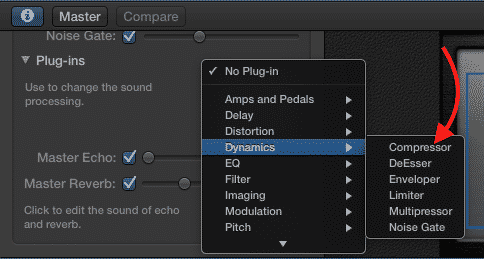
You can find it in the plug-ins drop down menu within Garageband’s Smart Controls window.
There are 4 main settings for you to fiddle with:
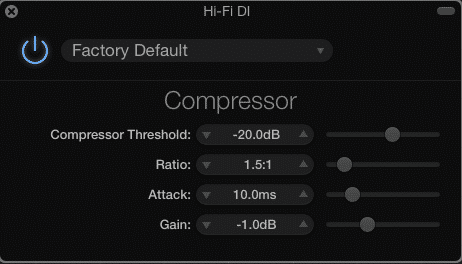
Threshold
The threshold controls the point at which the compression kicks in. When you click on the up/down arrows or adjust the slider a decibel (db) level is displayed. Any sound above this db level will be compressed.
Do you only want the louder sounds in your track compressed? Or do you want to really ‘level out’ your sound by setting the threshold at a lower volume?
Ratio
The ratio determines how much volume to reduce. The higher the ratio, the more volume is reduced and squished, while a lower ratio will reduce less volume.
So for example, if you select a ratio of 2:1 for every 1db that your audio goes over your threshold setting, it’s volume will be reduced by 2db.
If you select a ratio of 30:1, the volume will be reduced by 30db for every 1 db over your threshold setting (and sound majorly squashed)!
Attack
The Attack governs the speed at which compression kicks in.
How much attack you use depends entirely on what it is that you’re compressing. Snare drums, Kick drums and certain vocals (hip hop/rap) all traditionally have a fast attack setting, whereas pianos, guitars and other instruments – where preserving the dynamics and the need to sound natural are important – generally have a slower attack speed.
Gain
Remember that compression reduces loud sounds down to the same volume as the quieter sounds. Once this has happened, you need to boost the output level to make up for the lost volume. You do this by – you guessed it – increasing the gain.

How Do I Use It?
When I first started out with Garageband and discovered compression, I jumped in headfirst and compressed absolutely everything – whether it needed it or not.
“It doesn’t matter how clipped and sloppy that vocal track is – the compressor will fix it” I thought.
“As wonderful as that acoustic guitar part is that I’ve just recorded ( and taken 2 hours to play right….), it will sound even better when I squash the life out of it!”
Yeah right……
The result?
Everything sounded flat, lifeless and very UN-dynamic.
Also, I quickly found out that compression doesn’t actually fix anything in your audio.
Over compressing a less than stellar performance won’t magically make it sound great. You’ll end up with something that sounds lackluster and squashed – not good.
The best way to fix a bad take? – re-record a better one. Simple as that.
As I said earlier, the amount of compression required varies and depends largely on what instrument or sound you have recorded and what genre or style you are working in.
In pop music nowadays there is a lot of compression, on pretty much everything. Subtle dynamics simply aren’t as important as overall volume is.
With Jazz music however, dynamics are usually preserved as much as possible to capture and convey every nuance of a performance.
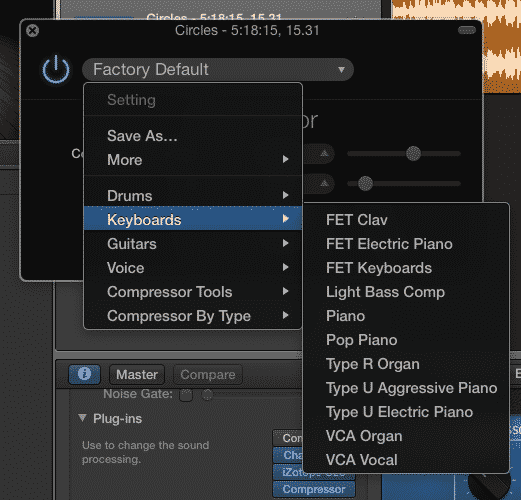
When it comes to your sounds, experimentation is key, but before you spend a lot of your time figuring out individual compressor settings from scratch, check out the supplied Compression pre-sets.
In Garageband the compressor comes with many contextual presets that can come close to sounding half decent and make for a great starting point to work from.
To give you an idea how these compression pre-sets sound, i’ve put together several audio examples for you to wrap your ears around…
The first part of each example let’s you hear how the instrument or track sounds without any compression applied. The second part of each example has the same instrument or track, this time with a compression pre-set applied.
Guitar
With guitars it all depends on the kind of part you’ve recorded. If it’s a lead guitar part, enough compression so that all the different notes maintain a consistent volume would be just fine.
Remember, you don’t want to overdo it – ruining your performance by squashing it to death with compression isn’t going to impress anyone…
If it’s a rhythm guitar part and you want it to kind of sit in the background and maintain the same volume throughout, you might not really be worried about the dynamic aspect of the performance.
This isn’t fixed remember, you need to experiment and find out what works best for YOUR project!
In the following clip you’ll hear a guitar melody in a mix without compression, then again with one of Garageband’s compression presets applied.
Did you hear the difference?
Notice in the first example it’s harder to make the notes out clearly – it doesn’t stand out much in the mix.
In the second example the lead guitar is much more at the forefront of the mix and it’s much easier to make out the notes being played.
Drums
Hmmm. Drums are a bit trickier.
Usually, all the separate parts of the drum kit will have different amounts of compression added to each of them.
Kick drums and snare drums will usually (not always) have compression added in some form, whereas you would rarely see cymbals compressed.
If you’re using Garageband’s Drummer Track (you really should – it’s awesome!), you need to be extra careful that you don’t completely flatten the highs and lows while adding enough punch that it will sit well in your mix.
Again – Experiment. Experiment. Experiment!
In this clip you’ll hear a Drummer Track in a mix without compression then again with a preset applied.
The drums are a lot quieter in the first example and sound a little buried in the mix. In the second example they really pop and add energy.
Vocals
With vocals, especially a lead or main vocal part, a little compression goes a long way.
In this situation, you really want to preserve as much of the natural dynamics of a performance as much as you can, while making sure the vocal sits front and centre in the mix.
Backing vocals can usually be compressed a bit more.
In this last clip, you’ll again hear the vocals without compression first, then again with a compressor preset applied.
You can really notice how much more well defined the vocal is in the second example. With the compression added, The vocals really come to the front of the mix, whereas without it added they struggle to be heard over the rest of the instruments.
I know I’ve said it a million times already, but EXPERIMENT! There is no right or wrong way to use the compressor, there’s only what works best for YOU!
Now that you’re equipped with the know how to bend Garageband’s Compressor to your will, get out there and start squashing!