
From classical pianos to EDM synths, percussion to hard rock guitar sounds; Garageband 10 comes pre packaged with a ton of great sounding virtual instruments that can really bring your project to life.
Digging into the instrument sounds available to you is as easy as opening a new Software Instrument track and choosing a Patch from the Library pane, but what about actually playing your chosen instrument? Ideally you could attach a USB keyboard or controller to your Mac, but maybe you’re just getting started with Garageband and don’t have access to one? Or maybe you’re on the move and didn’t have room to pack your keyboard/controller?
Luckily Garageband has an ingenious built in solution – Musical Typing.
What Is Musical Typing?
What Musical Typing essentially allows you to do is use the keys on your Mac’s keyboard to play notes, chords and melodies.
Here’s how it works:
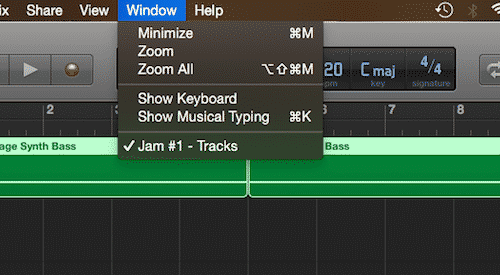
To open Musical Typing, first click on “Window” in the toolbar at the top of your screen.

Next, click on “Show Musical Typing” (Alternatively, use the keyboard shortcut ⌘+K)

The Musical Typing window will appear in all it’s glory!
Here’s a rundown of the features:
Pitch Bend: You can use the 1+2 keys to adjust the pitch of whatever note/s you are playing in real time.
Modulation: Keys 3 through 8 will add a set amount of modulation to the note/s played. The effect will differ depending on the instrument you have selected.
Sustain: You can toggle sustain on and off with the Tab key.
Black and White Keys: These are the keys you’ll use to create your melody. Garageband presents them in a way that corresponds to a single octave (C3 to C4 by default) on a Piano keyboard.
Octave: Use the Z and X keys to shift octaves for lower or higher pitched notes.
Velocity: The C and V keys allow you to change to velocity (how hard the note is struck) of your chosen instrument sound.
All that’s left for you to do is hit record and start playing! It can take a bit of getting used to, especially if you have larger fingers (my big fat fingers seem incapable of playing anything but the simplest melodies in Musical Typing), but you’ll soon get the hang of it.
Quantizing
If you have a large number of tracks in your Garageband project, using a lot of plug ins or are running an older machine, you may find the notes you’re recording using Musical Typing don’t always register as they should – leaving some notes sounding out of time with the rest of your project.
This issue (known as latency) is caused by your Mac trying to do too many things at once and while there are steps you can take before recording your performance to minimize it, you can also have Garageband automatically fix smaller timing issues for you.
It’s called quantization and here’s how it works in Garageband:
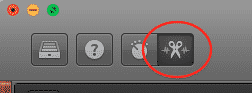
With the track you’d like to quantize selected, click on the Editor icon in the top right corner of the Garageband window (or use the keyboard short cut E).
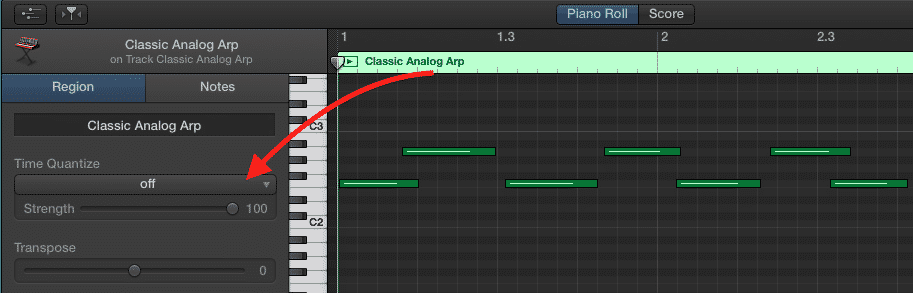
In the Editor window, click on the ‘Time Quantize’ drop down menu and select the note value you want to use (if you’re not sure which note value to use, try a few different ones out – there will almost certainly be a value that will ‘fit’).
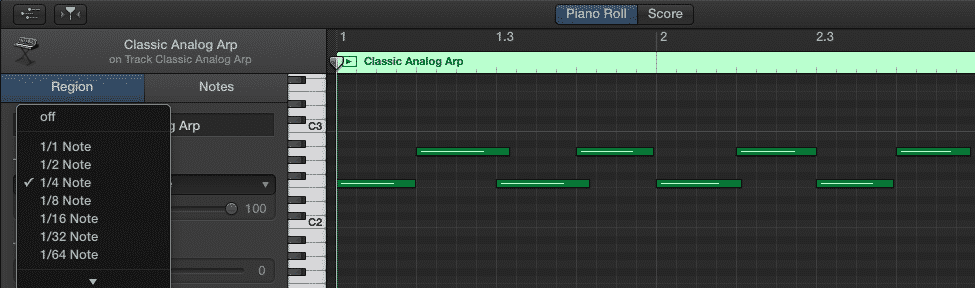
The notes that you’ve recorded will snap into the timing of the note value you chose and fixing any timing or latency errors!
Now that you know how to use Musical Typing in Garageband all that’s left to do is get stuck in and start experimenting…
Do you find Garageband’s Musical Typing function useful? Ran into any problems while using it? Leave a comment and let me know!